tcpforwarding issue

So I used to use ssh gateway to get to external servers through a shared server from our own server.
Example:
ssh to internalServer > ssh to external server
then these external servers got additional servers that can only be reached from the primary external server so example:
ssh to internalServer > ssh to external server1
ssh to internalServer > ssh to external server1 > ssh external server2
ssh to internalServer > ssh to external server1 > ssh external server3
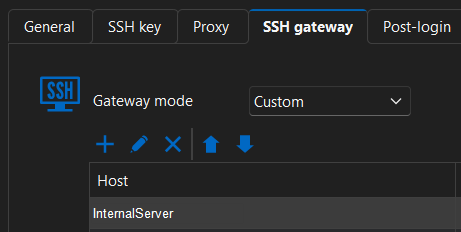
my setup for this is:
ssh to internalServer > ssh to external server1:
ssh to internalServer > ssh to external server1 > ssh external server2
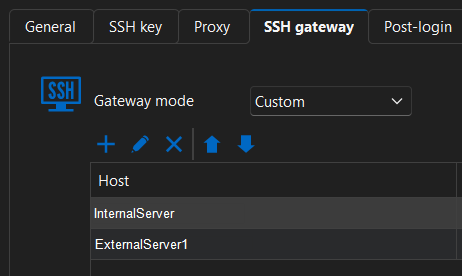
There have been some security changed at external server1 disabling tcpforwarding due to CIS requirements.
With this change "ssh to internalServer > ssh to external server1" still works.
"ssh to internalServer > ssh to external server1 > ssh external server2" no longer works as ExternalServer1 is preventing the jump to ExternalServer2 with this setup.
I can still use "ssh to internalServer > ssh to external server1" and then I have to manually ssh to externalServer2.
How else can I make this function work so i can tunnel to the 3rd server auto without enabling tcpforwarding?
All servers involved are RHEL
b33debd4-3286-4c33-be60-de5cf8042376.png
bdefae3c-420f-4af9-b955-65c0ca09f661.png
a1b6842d-21f9-4b4c-bb3f-103fab148a74.png
0b53ed40-1219-40c6-b108-aae25b3ca9ef.png
All Comments (3)
Hello,
Thank you for reaching out on this matter.
I confirmed the root cause. RDM's built-in SSH Gateway feature (the SSH Gateway tab on the connection entry) uses standard SSH direct-tcpip channels for each hop. This is the exact SSH primitive that is disabled when AllowTcpForwarding no is configured. As a result, direct connections through external1 continue to work, but any multi-hop chain through that host fails.
The good news is that there is no need to modify your CIS baseline. RDM includes a native workaround using the Proxy tab on the same connection entry.
Configure the proxy as Proxy Type = Local. In this mode, RDM runs a local command on your Windows machine and pipes its standard input/output into the SSH library. This approach uses only SSH exec channels and a final outbound nc connection—no direct-tcpip channels are used.
I tested the following procedure end-to-end in a lab with the same three-hop topology:
Client → Externalsrv1→ CIS-hardened Middle Host → Target
1. Prepare the servers (one-time)
On the first hop, install sshpass:
sudo apt install -y sshpass
# or
sudo dnf install -y sshpass
Alternatively, copy an SSH key from the external1 server's ~/.ssh directory into ~/.ssh/authorized_keys on the CIS-hardened middle host. That is the preferred production approach, while sshpass is useful for quickly validating the solution.
On the CIS-hardened middle host, ensure that nc or ncat is installed. Ubuntu typically includes nc by default. On RHEL:
sudo dnf install -y nmap-ncat
2. Create a wrapper batch file on the Windows client
Because nested quotation marks in RDM's Proxy command field are not parsed reliably, create a small batch file instead.
Save the following as:
C:\Users\<yourUser>\rdm-proxy.bat
@echo off
plink -ssh -batch -pw <gwPass> <user>@<Externalsrv1> "sshpass -p <midPass> ssh -o StrictHostKeyChecking=no <user>@<middleHost> nc %1 %2" 2>>C:\Users\<yourUser>\rdm-proxy.log
The 2>>...rdm-proxy.log portion captures stderr from every hop, making troubleshooting much easier if anything goes wrong.
plink.exe is included with RDM (or PuTTY). If it is not available on the PATH used by RDM, specify its full path.
3. Configure the RDM connection
For the final target (external2 / external3):
General
- Host: Set this to the final target's hostname or IP address. It must be reachable from the CIS-hardened middle host (since nc runs there), not necessarily from your Windows PC.
SSH Gateway
- Gateway Mode: None
- Remove any configured gateway entries.
Proxy
- Proxy Mode: Custom
- Proxy Type: Local
- Command:
C:\Users\<yourUser>\rdm-proxy.bat %h %p
Use %h and %p (single-letter placeholders). These are substituted by the terminal library. %host and %port are not substituted and will be passed literally.
The credentials configured on the RDM entry continue to be used normally for the final SSH authentication to the target.
4. Test outside RDM (if needed)
From PowerShell, run:
plink -ssh -pw <gwPass> <user>@<Externalsrv1> "sshpass -p <midPass> ssh -o StrictHostKeyChecking=no <user>@<middleHost> nc <targetIP> 22"
For the first test, omit -batch so you can accept Externalsrv1's host key. After it has been cached in the Windows registry, you can re-enable -batch.
If everything is working, you should see something similar to:
SSH-2.0-OpenSSH_8.2p1 Ubuntu-4ubuntu0.13
This banner comes from the final target, confirming that the connection successfully traversed both intermediate hosts without using TCP forwarding.
Press Ctrl+C to exit.
In summary, this solution uses three independent SSH connections, two SSH exec channels, and one outbound TCP connection while keeping the CIS AllowTcpForwarding no control fully intact.
If you run into any issues, please send me the contents of rdm-proxy.log SANITIZED. That log should make it straightforward to identify where the connection is failing.
Best regards,
Jacob Lafrenière
Hello,
Thank you for reaching out on this matter.
I confirmed the root cause. RDM's built-in SSH Gateway feature (the SSH Gateway tab on the connection entry) uses standard SSH direct-tcpip channels for each hop. This is the exact SSH primitive that is disabled when AllowTcpForwarding no is configured. As a result, direct connections through external1 continue to work, but any multi-hop chain through that host fails.
The good news is that there is no need to modify your CIS baseline. RDM includes a native workaround using the Proxy tab on the same connection entry.
Configure the proxy as Proxy Type = Local. In this mode, RDM runs a local command on your Windows machine and pipes its standard input/output into the SSH library. This approach uses only SSH exec channels and a final outbound nc connection—no direct-tcpip channels are used.
I tested the following procedure end-to-end in a lab with the same three-hop topology:
Client → Externalsrv1→ CIS-hardened Middle Host → Target
1. Prepare the servers (one-time)
On the first hop, install sshpass:
sudo apt install -y sshpass
# or
sudo dnf install -y sshpass
Alternatively, copy an SSH key from the external1 server's ~/.ssh directory into ~/.ssh/authorized_keys on the CIS-hardened middle host. That is the preferred production approach, while sshpass is useful for quickly validating the solution.
On the CIS-hardened middle host, ensure that nc or ncat is installed. Ubuntu typically includes nc by default. On RHEL:
sudo dnf install -y nmap-ncat
2. Create a wrapper batch file on the Windows client
Because nested quotation marks in RDM's Proxy command field are not parsed reliably, create a small batch file instead.
Save the following as:
C:\Users\<yourUser>\rdm-proxy.bat
@echo off
plink -ssh -batch -pw <gwPass> <user>@<Externalsrv1> "sshpass -p <midPass> ssh -o StrictHostKeyChecking=no <user>@<middleHost> nc %1 %2" 2>>C:\Users\<yourUser>\rdm-proxy.log
The 2>>...rdm-proxy.log portion captures stderr from every hop, making troubleshooting much easier if anything goes wrong.
plink.exe is included with RDM (or PuTTY). If it is not available on the PATH used by RDM, specify its full path.
3. Configure the RDM connection
For the final target (external2 / external3):
General
- Host: Set this to the final target's hostname or IP address. It must be reachable from the CIS-hardened middle host (since nc runs there), not necessarily from your Windows PC.
SSH Gateway
- Gateway Mode: None
- Remove any configured gateway entries.
Proxy
- Proxy Mode: Custom
- Proxy Type: Local
- Command:
C:\Users\<yourUser>\rdm-proxy.bat %h %p
Use %h and %p (single-letter placeholders). These are substituted by the terminal library. %host and %port are not substituted and will be passed literally.
The credentials configured on the RDM entry continue to be used normally for the final SSH authentication to the target.
4. Test outside RDM (if needed)
From PowerShell, run:
plink -ssh -pw <gwPass> <user>@<Externalsrv1> "sshpass -p <midPass> ssh -o StrictHostKeyChecking=no <user>@<middleHost> nc <targetIP> 22"
For the first test, omit -batch so you can accept Externalsrv1's host key. After it has been cached in the Windows registry, you can re-enable -batch.
If everything is working, you should see something similar to:
SSH-2.0-OpenSSH_8.2p1 Ubuntu-4ubuntu0.13
This banner comes from the final target, confirming that the connection successfully traversed both intermediate hosts without using TCP forwarding.
Press Ctrl+C to exit.
In summary, this solution uses three independent SSH connections, two SSH exec channels, and one outbound TCP connection while keeping the CIS AllowTcpForwarding no control fully intact.
If you run into any issues, please send me the contents of rdm-proxy.log SANITIZED. That log should make it straightforward to identify where the connection is failing.
Best regards,
@Jacob Lafrenière
Sorry I can not install sshpass. Any other options?
Hello,
No problem, there is a cleaner alternative that doesn't require installing any additional packages.
Instead of sshpass, you can use standard OpenSSH key-based authentication between the gateway server and the middle host. This uses only built-in OpenSSH functionality and doesn't require any changes to your CIS baseline beyond adding your public key to your own authorized_keys file on the middle host, which is standard SSH administration.
1. Prepare the servers (one-time)
On the gateway server, generate a key for the account that will perform the second hop:
# On the gateway server, as the user that will do the jump
ssh-keygen -t ed25519 -N '' -f ~/.ssh/id_ed25519
ssh-copy-id -o StrictHostKeyChecking=no <user>@<middleHost>
ssh-copy-id will prompt for your password on the middle host once. After that, authentication is performed using the key.
If ssh-copy-id is not available, you can install the key manually:
# On the gateway server
cat ~/.ssh/id_ed25519.pub
Copy the output, then log into the middle host once using password authentication and run:
mkdir -p ~/.ssh && chmod 700 ~/.ssh
echo "PASTE THE PUBLIC KEY HERE" >> ~/.ssh/authorized_keys
chmod 600 ~/.ssh/authorized_keys
Also ensure that nc (or ncat) is installed on the CIS-hardened middle host, as in the previous instructions.<
2. Update the batch file
Replace the sshpass command with standard key authentication:
@echo off
plink -ssh -batch -pw <gwPass> <user>@<gatewayHost> "ssh -o BatchMode=yes -o StrictHostKeyChecking=no <user>@<middleHost> nc %1 %2" 2>>C:\Users\<yourUser>\rdm-proxy.log
The BatchMode=yes option ensures the inner SSH connection fails immediately if key authentication isn't working, rather than waiting for a password prompt.
Everything else (RDM configuration, PowerShell testing, and verification) remains exactly the same as in my previous post.
If your security policy also prohibits passphrase-less keys on the gateway server, there are still a couple of options:
- Use a passphrase-protected key and load it into Pageant (included with PuTTY/RDM), then have plink authenticate through the agent.
- Alternatively, use SSH agent forwarding (plink -A) so the private key remains on your Windows workstation and only authentication requests are forwarded. This relies on AllowAgentForwarding rather than AllowTcpForwarding, so it may still comply with your CIS configuration if agent forwarding is permitted.
Let me know if this helps!
I look forward to your reply.
Best regards,
Jacob Lafrenière